Getting started with Hugo, GitHub, and DigitalOcean
· Hugo
![]()
Hugo touts itself as the world’s fastest framework for building websites. It’s open source and claims to make building websites fun again.1 Given that, I wanted to take it for a test drive. So I spun up a site and have to admit… it’s pretty fun! I’m still finding my way around, but wanted to share how I got things up and running.
tl;dr: I develop locally, push to GitHub, and then use DigitalOcean’s App Platform to automatically build and deploy the site whenever I push changes to GitHub.
💻 Install Hugo Locally
I use Homebrew as a package manager, which makes installing Hugo locally pretty straightforward. If you’re using Homebrew, you can open up your terminal and run:
brew install hugo # https://formulae.brew.sh/formula/hugoFor other platforms or package managers, you can refer to Hugo’s installation docs to get up and running. Once installed, you can create a new Hugo site with:
hugo new site my-hugo-site # Change `my-hugo-site` to whatever you'd likeThen you can navigate to the new directory, initialize a new Git repository, and make your first commit:
cd my-hugo-site # Navigate to the new project directory
git init # Initialize a new git repo
git add . # Stage files in directory for commit
git status # Optionally check files to be commited
git commit -m "Initial commit" # Make the initial commit
And with that, you have Hugo installed locally and your first site created. 🎉
🎨 Find and install a theme
Hugo doesn’t come with pre-installed themes out-of-the-box. You’ll need to install or create one. There are quite a few existing themes you can view and choose from in Hugo’s Theme collection. I chose the Paper theme and installed it as a Git submodule:
git submodule add https://github.com/nanxiaobei/hugo-paper themes/paperBy installing the theme as a Git submodule, I’m able to manage it as a dependency. If a new version of the theme is released, I can update the copy on my site by updating the theme submodule.
Now we just need to tell Hugo to use that theme. We can do so by editing Hugo’s config file. By default, that will be hugo.toml. Since I am using the Paper theme, I’ll specify that in hugo.toml like so:
baseURL = 'https://example.org/'
languageCode = 'en-us'
title = 'My New Hugo Site'
theme = 'paper'
And then we can commit our changes:
git add .
git commit -m "Install and activate Paper theme"
⚠️ Note: DigitalOcean looks for config.toml, config.yaml, or config.json to build Hugo. I renamed hugo.toml to config.toml to properly build the site.
📖 Create your first page
With the theme installed, we can now take it for a test drive by building the site locally:
hugo serverYou can open your browser and navigate to the site (“ by default). You should now see that we’ve got a site and a theme but no content. Let’s create a page and edit it:
hugo new about.md # Create the page
code content/about.md # Open the file in VS Code
With the file open in VS Code, we can see that the hugo new command automatically generates some front matter for our new About page:
+++
title = 'About'
date = 2024-07-14T11:45:30-07:00
draft = true
+++
Front matter is Hugo’s way to add metadata to our content. You can write the page content in Markdown below the closing +++ to create your about page.
We’ll need to allow visitors to navigate to our new page, so we should include it in our primary navigation. There are a number of ways to handle menus in Hugo. I’ll use the content’s front matter to do so:
+++
title = 'About'
date = 2024-07-14T11:45:30-07:00
draft = false
menu = 'main'
+++

Hi there, this is my about page!
Now you can set draft from true to false. Save the file, and you will see the changes in-browser without needing to reload or restart the development server. Pretty cool!
✏️ Write your first post
The process to create a post is similar to that of creating a page. You’ll need to decide on a content hierarchy for posts. I chose to give each post its own subdirectory inside of the /posts/ directory:
hugo new posts/hola-mundo/index.md # Create index file in new directory
code content/posts/hola-mundo/index.md # Open the new file in VS Code
We can see there is front matter automatically generated. Let’s work with this post in draft mode. If your Hugo development server is still running, you can stop it with cmd + c in your terminal window. Then, restart it and include the -D flag to build drafts:
hugo server -DThe -D is short for --buildDrafts. With that enabled, you’ll be able to view draft content on your local development server. You can continue to edit your draft post and see changes automatically in-browser. When you’re happy with the post, you can set draft to false and commit your changes:
git add content
git commit -m "Create first page and post"
📝 Note: You can add public and .hugo_build.lock to your .gitignore file.
🤖 Push to GitHub
Now that we’ve got our site working locally, we can push to GitHub. Login to your GitHub account and create a new repository. You can add an optional description and set it to public or private.
Once the remote repo is created, you can head back to your local directory and set the remote origin:
git remote add origin git@github.com:{your_username}/my-hugo-site.git
git push -u origin main # Push local files to GitHub
You can refresh the GitHub repo in your browser and you should see your project files. Now we can build and deploy them.
🛠️ Build and deploy to DigitalOcean
There are a lot of hosts to choose from to publish your Hugo site. I decided to use DigitalOcean2 since I have other projects there and they allow up to three static sites to be hosted on their App Platform for free.
If you’d like to do the same, you can follow these steps to publish your site.
- Login to your DigitalOcean account.
- Navigate to App Platform.
- Click the “Create App” button.
- In the “Resource” step, select “GitHub” as the provider.3
- Select the repository you created above.
- Ensure
Autodeployis enabled and click “Next”. - Continue through the settings to “Review”.
- Click “Create Resources”.
Now the app will build. You can click “Go to Build Logs” to follow the process. Once the first build is complete it will automatically be deployed. You can click the “Live App” button to view your site. You’ll notice that some theme files are missing. That’s because we need to modify our baseURL setting in config.toml to properly reference the app. Depending on your use case, there are a couple ways to do this:
- If you don’t plan to use your site with a domain, you can use the DigitalOcean app’s URL as your
baseURLin config.toml. - If you plan to use a domain, you’ll need to configure your DNS settings to do so and set
baseURLto your desired address.
If the former, your config.toml file may look something like:
baseURL = 'https://{your_app_address}.ondigitalocean.app'
languageCode = 'en-us'
title = 'My New Hugo Site'
theme = 'paper'
You can commit those changes and push to your remote GitHub repo. That will automatically trigger a new build and deploy process. Once that process is complete, you can refresh the page in your browser and your site should load as expected.
🎉 And we’re live!
That’s it! We’ve now got a Hugo site that we can develop locally. When changes are pushed to GitHub, it will trigger an automatic build and deploy process which will update the production site on DigitalOcean’s App Platform.
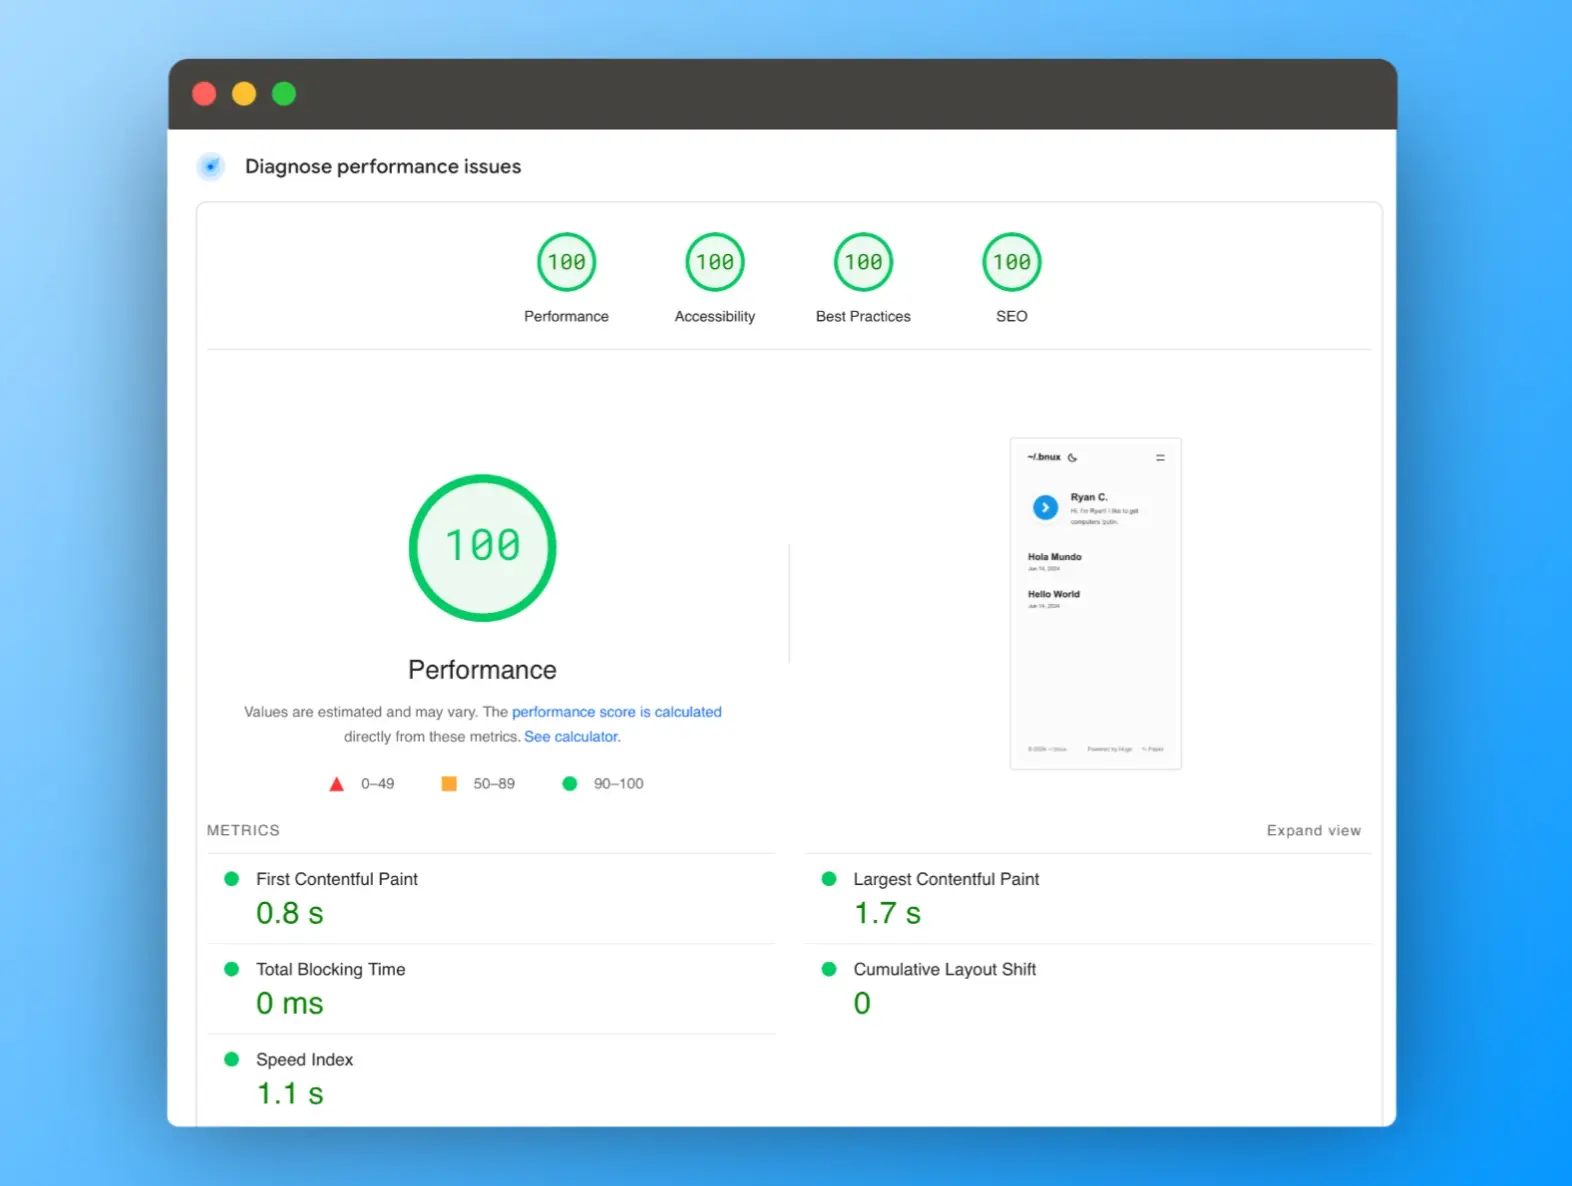
Granted, my site is small. But the build process is really fast. And since the site is served as a series of static pages, loading times are snappy:
👉 Next steps
Hugo’s config file allows you to set and adjust your site settings. Many themes also come with additional configuration options. For example, here’s a snippet from my config.toml that sets some of the basics:
baseURL = "https://read.ryancowl.es/"
languageCode = "en-us"
title = "~/.bnux"
theme = "paper"
enableRobotsTXT = true
And here is a snippet that includes some of Paper’s theme options:
[params]
color = "gray"
monoDarkIcon = true
rss = true
Experimenting with these configuration settings can be a helpful way to familiarize yourself with the basic concepts of working with Hugo. I’ll dig into more as I continue to experiment and learn my way around. At the very least, I can say that it is fun and the framework is indeed pretty fast!
Footnotes
-
“Hugo is one of the most popular open-source static site generators. With its amazing speed and flexibility, Hugo makes building websites fun again.” https://gohugo.io ↩
-
This is an affiliate link that will give you credit with DigitalOcean. If you decide to use it, I’ll receive credit to my DigitalOcean account. ↩
-
You will need to set/modify your GitHub permissions for DigitalOcean. ↩